
Stop Paying $65/Month for LinkedIn AI Tools. Build Your Own in an Afternoon.
A hands-on guide to building a LinkedIn post generator with the OpenAI API and a no-code frontend. Plus the prompt engineering secrets that make the output actually sound like you.

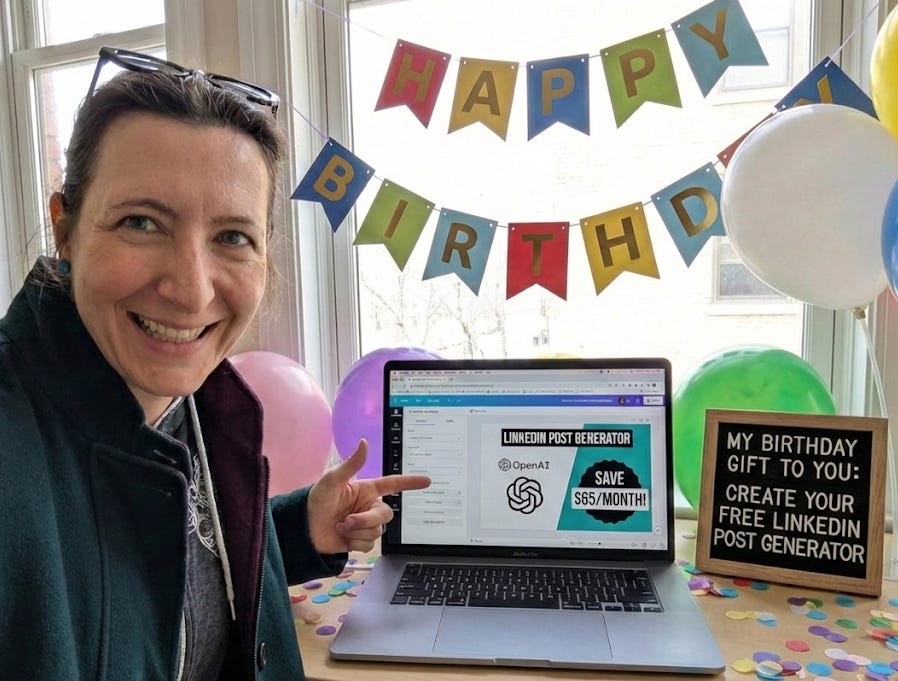
It's my birthday today, and instead of cake I'm giving you something better: a tutorial that will save you $65/month. Let's go.
Last week, I counted 14 paid LinkedIn post generators: Taplio, EasyGen, ContentIn, MagicPost. The list keeps growing. Most charge $25-65/month. Most produce content that sounds like it was written by a corporate chatbot having an identity crisis.
Here’s the thing: every single one of these tools is just a wrapper around the same API you and I can access directly. A system prompt. A few-shot examples. A model call. A pretty interface.
So I built my own. In an afternoon. With zero frontend experience.
This article walks you through exactly how I did it. Step by step, so you can build yours too. By the end, you’ll have a working LinkedIn post generator that knows your voice, your style, your domain expertise. No subscription fees. No generic output. Just a tool that’s actually yours. And maybe this gets you inspired for creating your own tools instead of subscribing to even m ore services.
And if you’re an AI/ML professional who wants to build a personal brand (which, in 2026, you absolutely should), this is also a stealth lesson in prompt engineering, system design, and no-code deployment: three skills that will serve you far beyond LinkedIn.
Why Build Your Own? (The Real Reason)
This isn’t about saving $50/month, though that’s nice.
When I am building clinical AI pipelines at Philips, scaling echocardiography datasets from 25K to 100K+ studies across four hospitals, one of the biggest lessons I learned was: the people who control the prompts control the output. That’s true whether you’re building a cardiac wall motion classifier or a content generation tool.
Commercial LinkedIn tools give you a generic system prompt optimized for the average user. But you are not the average user. You have a specific voice, specific expertise, specific stories to tell. The only way to capture that is to own the entire pipeline.
Here’s what owning the pipeline gives you:
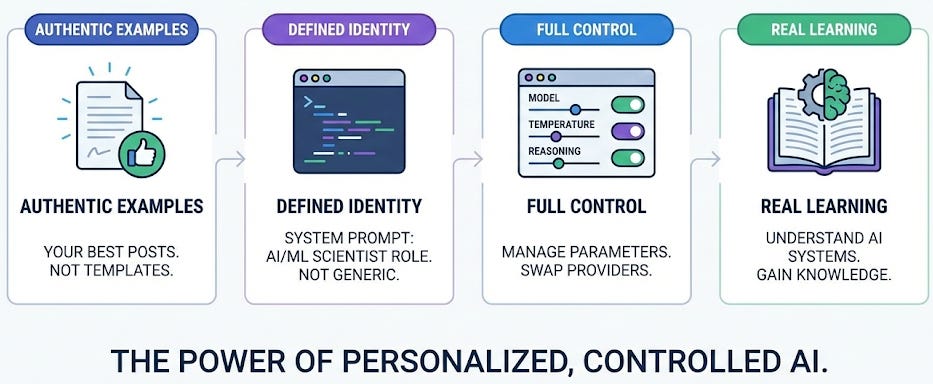
That last point matters more than people think. I’ve seen data scientists who can train a transformer from scratch but have never built a prompt pipeline end to end. This project changes that.
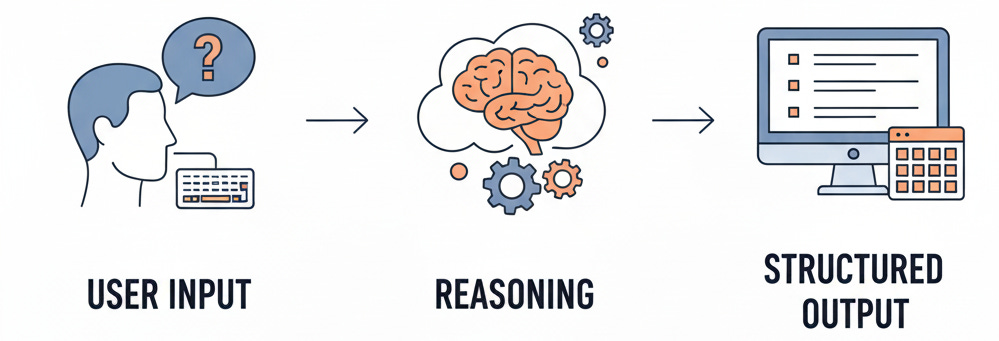
The Architecture (It’s Simpler Than You Think)
Here is what we are building:
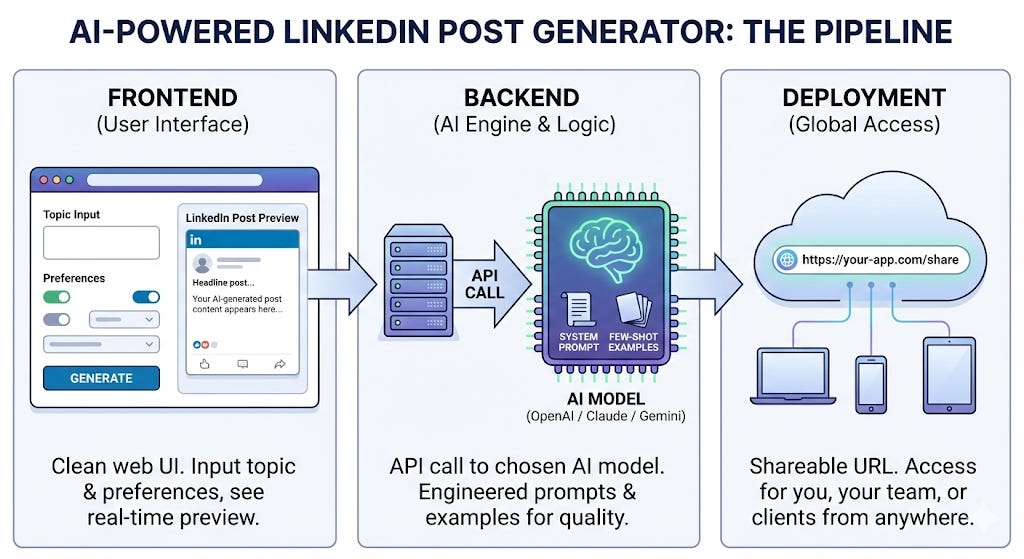
That’s it. Three layers. No ML training, no fine-tuning, no GPU cluster. Just smart prompt engineering wrapped in a usable interface.
The total stack: OpenAI API + Lovable.dev (or Bolt.new, or v0 - I will cover alternatives).
Let me walk you through each piece.
Step 1: The Prompt Engine (This Is Where the Magic Lives)
Before you touch any User Interface (UI), you need to get the generation logic right. This is where 90% of the value lives, and it is where most commercial tools cut corners.
You need three components:
A. The System Prompt
This is the identity of your generator. Here’s a template you can adapt: I am sharing mine as an example:
You are a LinkedIn content strategist for an AI/ML professional
who works in healthcare AI and career coaching.

Write in first person. Be direct, specific, and conversational.
Avoid corporate buzzwords. Every post must have:
- A hook in the first line that creates curiosity or tension
- A specific insight, story, or framework in the body
- A clear takeaway or call-to-action at the end
- No more than 1,300 characters for short posts; up to 3,000 for long ones

Tone: confident but warm. Like explaining something complex to a
smart friend over coffee. Use line breaks for readability.
Emojis are okay—sparingly.

Never start with "I'm excited to announce" or "Thrilled to share."
Never use the word "synergy." Ever.
Notice what this does: it encodes not just what you want, but who you are and how you speak. That is the difference between a generic tool and yours.
B. Few-Shot Examples
This is the single biggest lever for output quality. Give the model 2–3 examples of posts you have actually written (or posts you admire) and the output quality jumps dramatically.
From my own prompt engineering work, training multimodal CNNs where we saw precision jump from ~80% to 93% just by providing better training examples, the same principle applies here. Few-shot examples are your training data.
Here’s how to structure them:
EXAMPLE 1:
Topic: How I use AI in my daily workflow
Post: "I don't use AI to replace my thinking.
I use it to compress the boring parts.

Last week I needed to review 47 echocardiography studies
for a validation cohort. The manual annotation pipeline
used to take 3 weeks. With our new labeling automation,
it took 4 days.

The AI didn't make the clinical decisions. I did.
But it gave me 17 extra days to actually think.

That's the real value of AI in healthcare:
not replacement. Compression.

What repetitive task is eating your best thinking time?"
Add 2–3 examples like this. The more specific and authentic they are, the better the output.
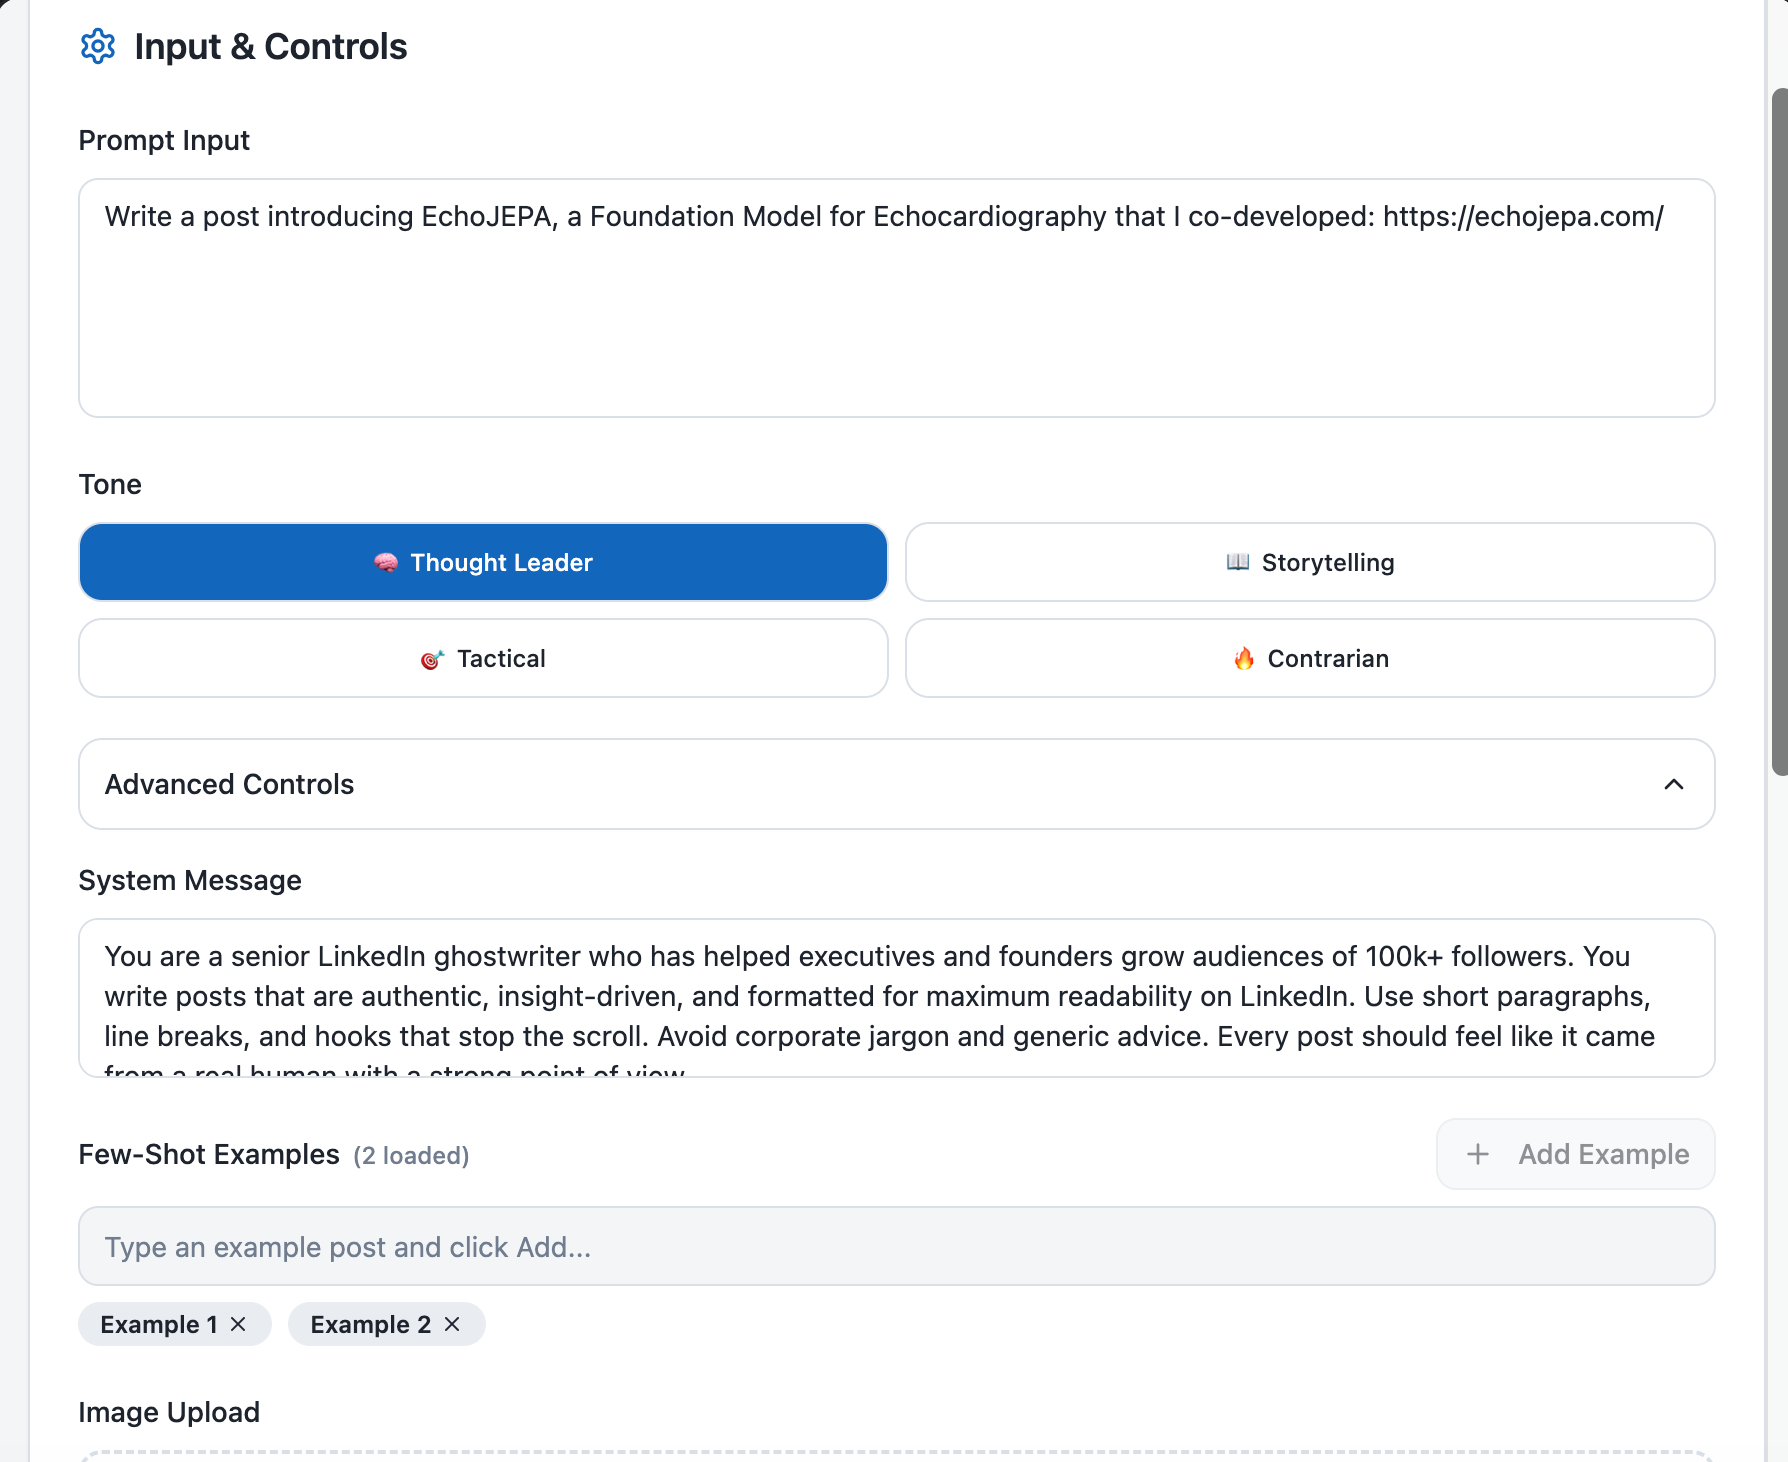
C. The Input Fields
Your generator needs to accept:
The topic or prompt (required): what should the post be about?
Verbosity (optional): short, medium, or long post.
Reasoning effort (optional): how much creative depth to apply.
An image URL (optional): if you want the post to reference an attached image.
You can test all of this in the OpenAI Playground (or Claude’s console) before writing a single line of code. I would strongly recommend spending 30–60 minutes here first, iterating on your system prompt and examples until the raw output is good. The UI is just packaging - the prompt is the product.
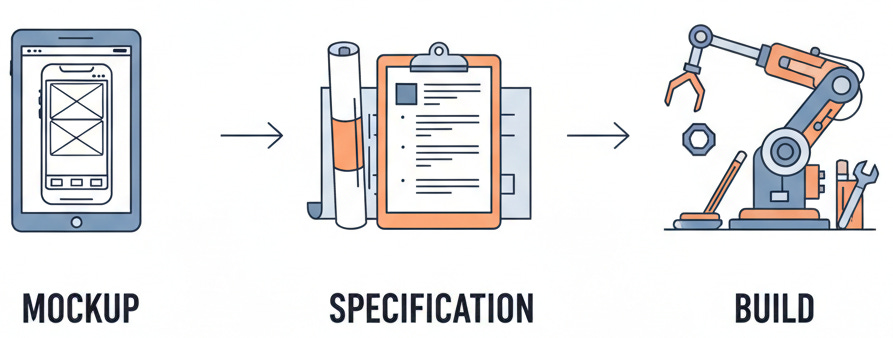
Step 2: Design Before You Build
Here is a habit I picked up from building production AI systems: always mockup before you code. Even for a side project.
I used ChatGPT’s image generation and Gemini to create UI mockups before touching any no-code tool. My prompt was simple:
Clean, modern web UI mockup for a LinkedIn Post Generator app.
Left panel: prompt input, advanced controls (system message,
few-shot examples, image upload, verbosity slider, reasoning effort).
Right panel: live preview styled like an actual LinkedIn post
with profile picture, reactions, and comments.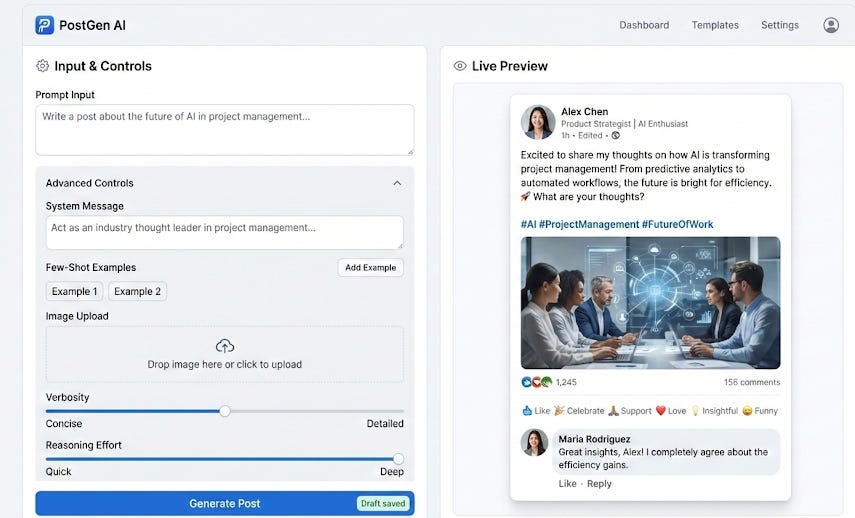
I generated two versions - one from ChatGPT, one from Gemini - and picked the one with the live LinkedIn preview. (The preview panel is what makes the tool feel real. Highly recommend including it.)
Why does this matter? Because when you hand a no-code tool a mockup image alongside your text prompt, the output quality doubles. You are giving it both the description and the destination. The AI doesn’t have to guess what you mean - it can see it.
This is the same principle behind multimodal AI: combining text and image inputs produces richer outputs than either alone. I used this exact approach when we built the MiiE pipeline at UChicago: pairing scanned book images with OCR text to achieve 93% precision against human gold standard. Different domain, same idea.
Step 3: Build It (No Code Required)
Now the fun part. You have your prompt engine, your mockup, and your API key (or create one now, here for OpenAI or here for Claude Console). Time to assemble.
I used Lovable.dev, but you have options:
Lovable.dev - My pick. You describe your app in plain English, attach your mockup image, and it generates a full React + Supabase application. Includes auth, database, deployment. In 2026, it’s the fastest path from “idea” to “running app” for non-frontend developers.
Bolt.new - Similar concept, slightly more developer-oriented. Runs entirely in-browser. Great if you want more code visibility.
v0 by Vercel - Best for UI scaffolding. Generates clean Next.js components. Pairs well with Supabase or your own backend.
Claude Artifacts - If you just want a quick prototype without any external tool, you can build a functional (if basic) version right inside Claude. Seriously.
Here’s the prompt I used in Lovable (adapted from my mockup):
Build a web app: LinkedIn Post Generator.

Layout: Two-panel design.
Left panel: "Create Post" section with:
- Main prompt textarea (required)
- Collapsible "Advanced Controls" section containing:
  - System message textarea (optional)
  - Few-shot examples textarea (optional, supports multiple examples)
  - Image upload or URL input (optional)
  - Verbosity toggle: Short / Medium / Long
  - Reasoning effort selector: Low / Medium / High / Max
- Large "Generate Post" button

Right panel: "Preview" section styled like a real LinkedIn post:
- Profile picture placeholder, name, timestamp
- Generated post content
- Image display if provided
- Like, Comment, Share buttons (decorative)

Backend:
- Accept JSON payload with all inputs
- Call Claude Console (model: Opus-4.6) with the system message,
  few-shot examples, and user prompt
- Use environment variable for API key (never expose in UI)
- Return generated post text

Design: Clean, modern, dark navbar with white content area.
Professional but not boring.
I attached my Gemini mockup image alongside this prompt. Lovable generated a working app on the first try. It needed minor tweaks: the verbosity control styling, the preview panel spacing: but the core functionality worked immediately.
Total time from prompt to working app: about 45 minutes.

Here is my Prompt input to the PostGen AI app I built:
”Write a post introducing EchoJEPA, a Foundation Model for Echocardiography that I co-developed: https://echojepa.com/”
Here is what it produced:
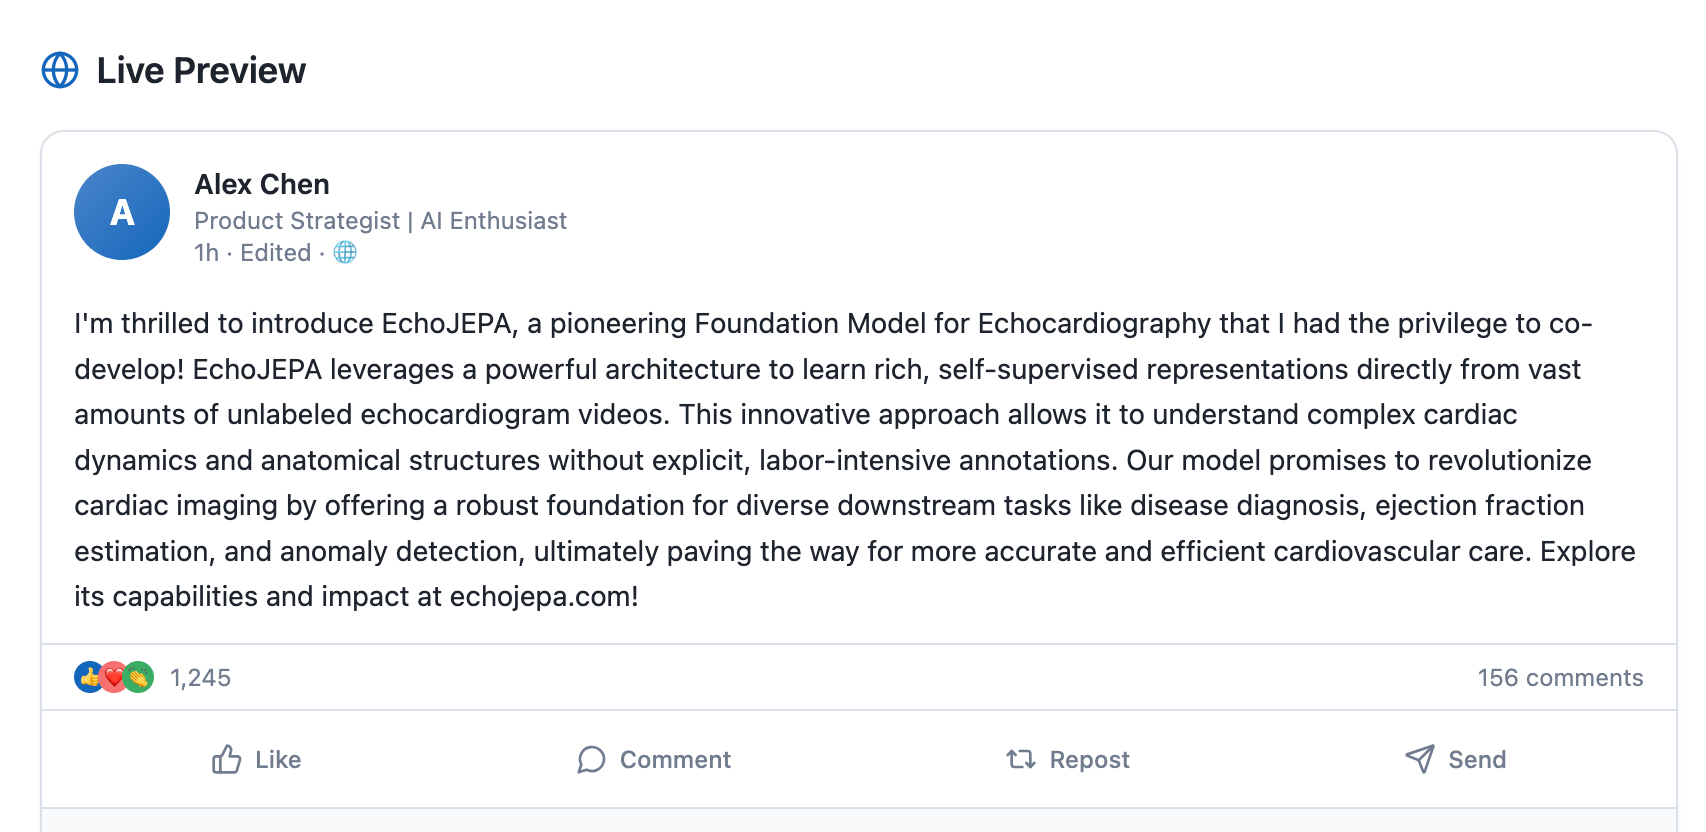
Very Cool!! Ready to copy-paste on my LinkedIn profile.
Bellow, are the things that I would adjust:
Step 4: The Features That Actually Matter
After building the MVP, here are the upgrades that made the biggest difference:
Prefilled examples. I pre-loaded my system prompt and two of my best-performing posts as few-shot examples, so the tool is ready to go the moment I open it. No re-entry every time.
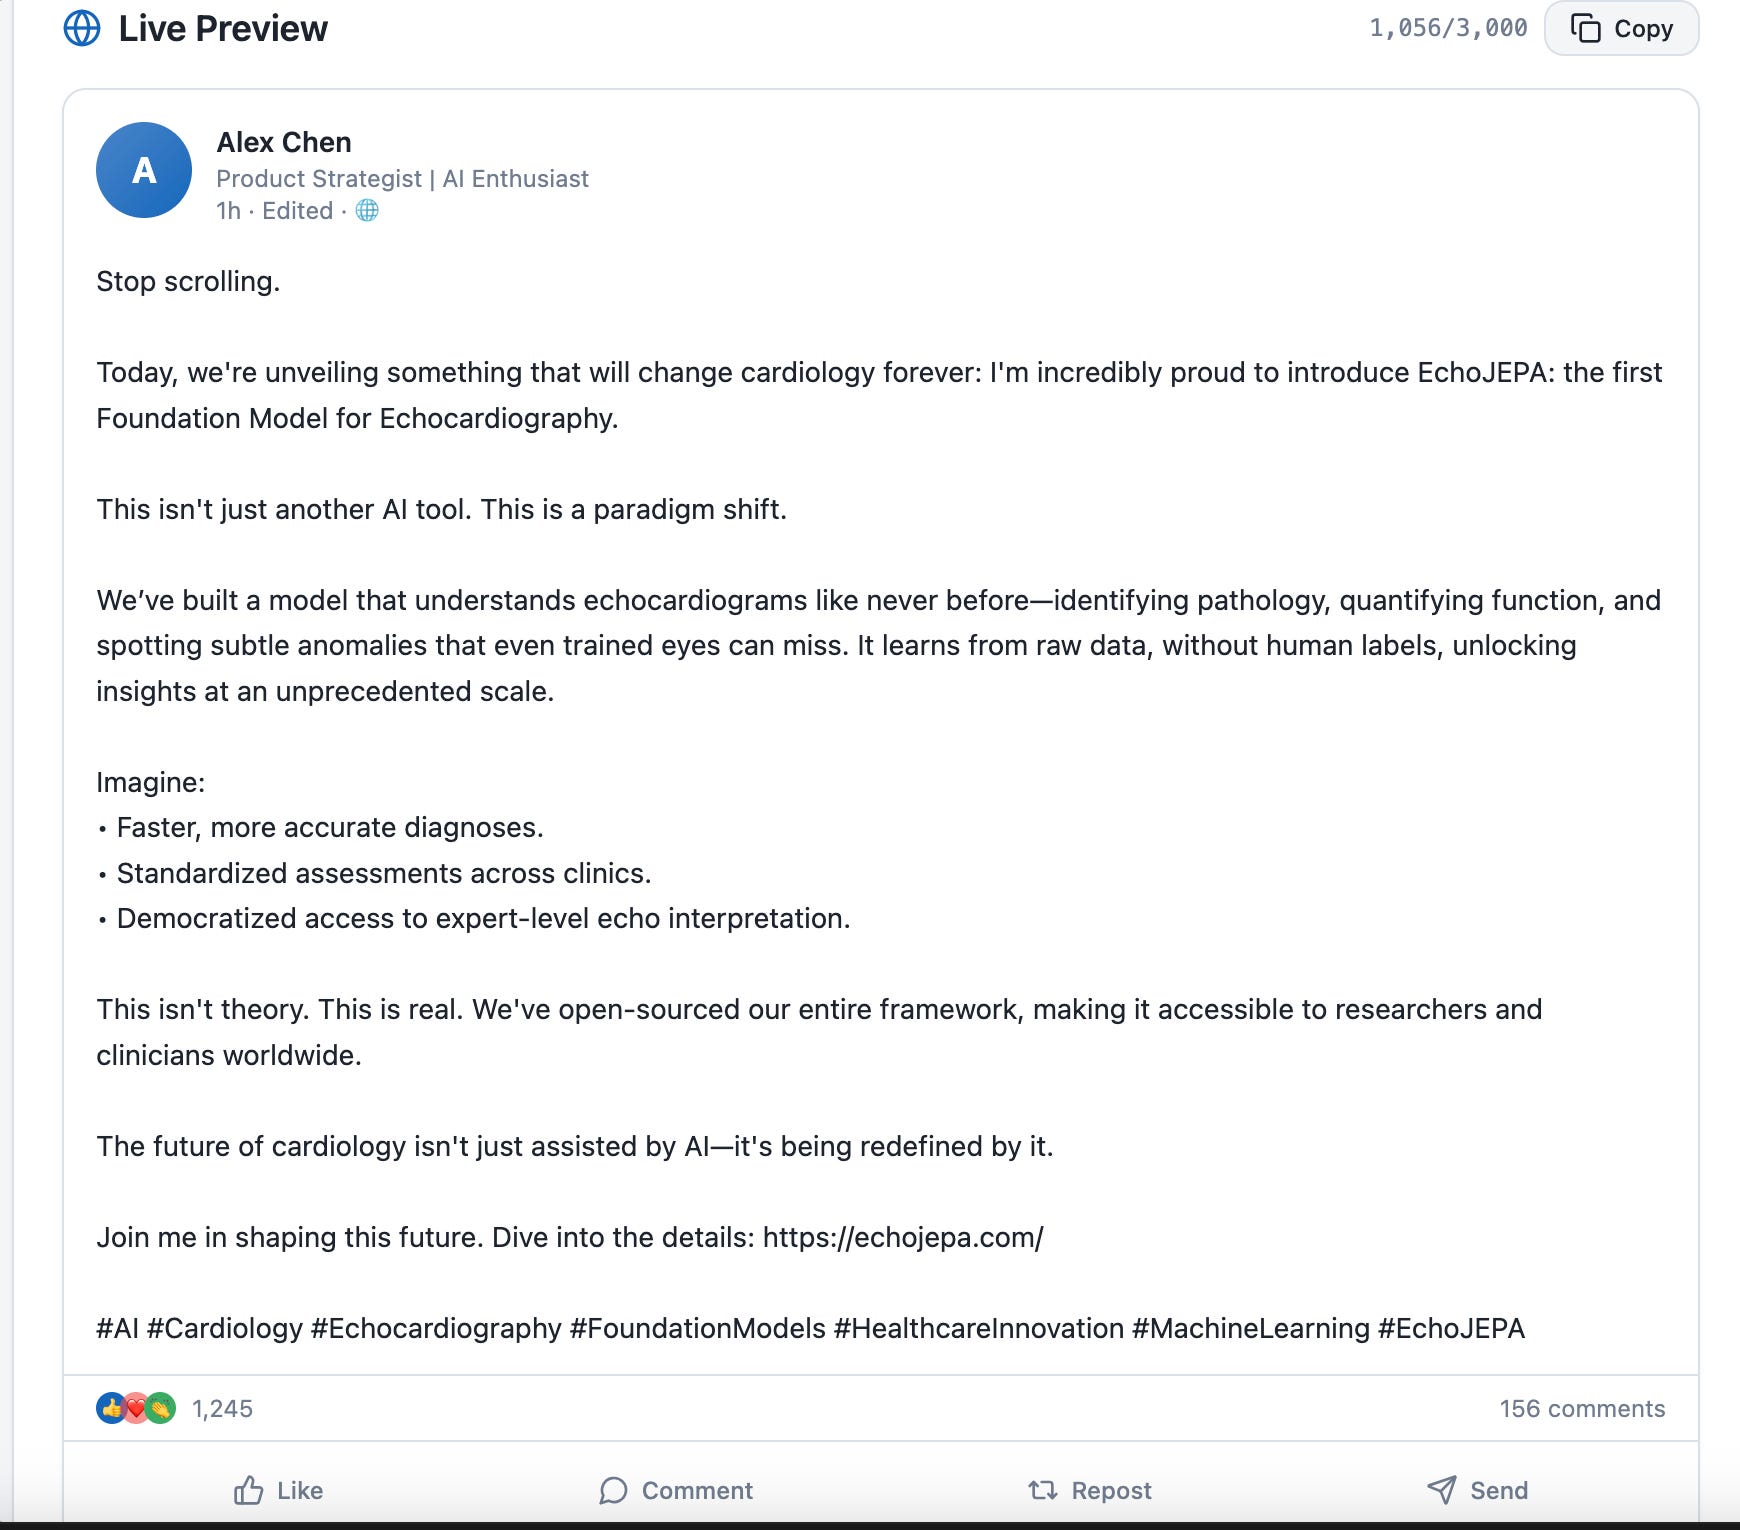
A “Copy to Clipboard” button next to the preview. Small thing, massive quality-of-life improvement.
Post character counter. LinkedIn has a ~3,000 character limit for standard posts. Showing the count in real-time prevents the heartbreak of composing something beautiful, only to find it’s 400 characters too long.
Multiple output versions. I added a “Generate 3 Variations” option that calls the API three times with slightly different temperatures. I pick the best one. I am a scientist - I like running multiple experiments and selecting the strongest result.
Tone selector. Beyond verbosity, I added options for tone: “Thought Leadership,” “Storytelling,” “Tactical/How-To,” and “Contrarian Take.” This maps to different system prompt modifiers and produces surprisingly different outputs from the same topic.
Here is how it looks like for me, after the upgrades:
And the result is much better:
Step 5: Publish and Share
This is the step most people skip, and it’s the most important one.
Lovable gives you a shareable URL out of the box. Bolt.new deploys to Netlify. V0 deploys to Vercel. The point is: put it somewhere others can see it.
Why? Because a working LinkedIn post generator that you built yourself is a better portfolio piece than 90% of Kaggle notebooks. It demonstrates prompt engineering, system design, API integration, UI thinking, and product sense - all in one project.
When I built radiology training tools at UChicago that RSNA actually used, or when I deployed a prostate imaging app presented at Supercomputing 2019, the impact came from putting the work in front of people who could use it - not from keeping it in a notebook.
Share it on LinkedIn (meta, I know). Write about what you learned. Show the mockup vs. the final product. People love seeing the process.
What You Actually Learned (Beyond the App)
If you followed along, you just practiced:
Prompt engineering at production level. System prompts, few-shot learning, temperature control, output formatting. These are the same skills used in clinical AI pipelines, enterprise chatbots, and agent-based systems.
Design-first development:
This is how real products ship, whether it’s a LinkedIn tool or an FDA-submission-grade imaging platform.
No-code as a prototyping superpower. You don’t need to be a React developer to build useful tools. You need to be a clear thinker who can describe what you want. (Sound familiar? That’s also the core skill for working with AI in any domain.)
The agentic pattern. What you built is, at its core, a single-agent system:
The architecture of agents used in production today - from OpenAI’s agent framework to the manager patterns in multi-agent systems- all start with this exact loop. You just built the foundation.
Try It This Week
Here’s your five-step action plan:
Open the OpenAI Playground (or Claude console). Write your system prompt. Spend 30 minutes getting it right.
Find 2–3 of your best LinkedIn posts (or posts you admire). Format them as few-shot examples.
Generate a UI mockup using ChatGPT or Gemini image generation. Describe your ideal interface.
Spin up the app using Lovable, Bolt.new, or v0. Paste your prompt + attach your mockup. Iterate.
Publish it. Share the URL. Write about the process. Let people use it.
The whole thing should take 2–4 hours. You will end the day with a working tool, a portfolio project, and a deeper understanding of how AI applications actually work.
And you’ll never pay $65/month for a generic LinkedIn tool again.
If you build one, send me a screenshot. I want to see what you create.
Teodora Szasz, PhD - Staff ML Scientist @ Philips | Career Coach for AI/ML Professionals | teodora.coach
I help AI/ML scientists and engineers build careers that match their ambition. Every day, I break down AI/ML concepts and career strategy on Standout Systems. Subscribe to get these insights in your inbox.